Autopay Schedules in Agent Interface
Autopay enables consumers to create a schedule of recurring transactions that automatically run at a specified cadence. This increases the likelihood of on-time payments for clients and gives consumers peace of mind with one less bill to worry about paying. Autopay schedules can be set up to run weekly, every other week, monthly, twice a month, or on the last day of each month. Each individual payment is subject to a convenience fee.
Setting Up an Autopay Schedule
To set up an autopay schedule for a consumer, access his/her/their Account page and complete the following steps:
-
From the Account page, click the Set Autopay button or use the Ctrl+2 keyboard shortcut.
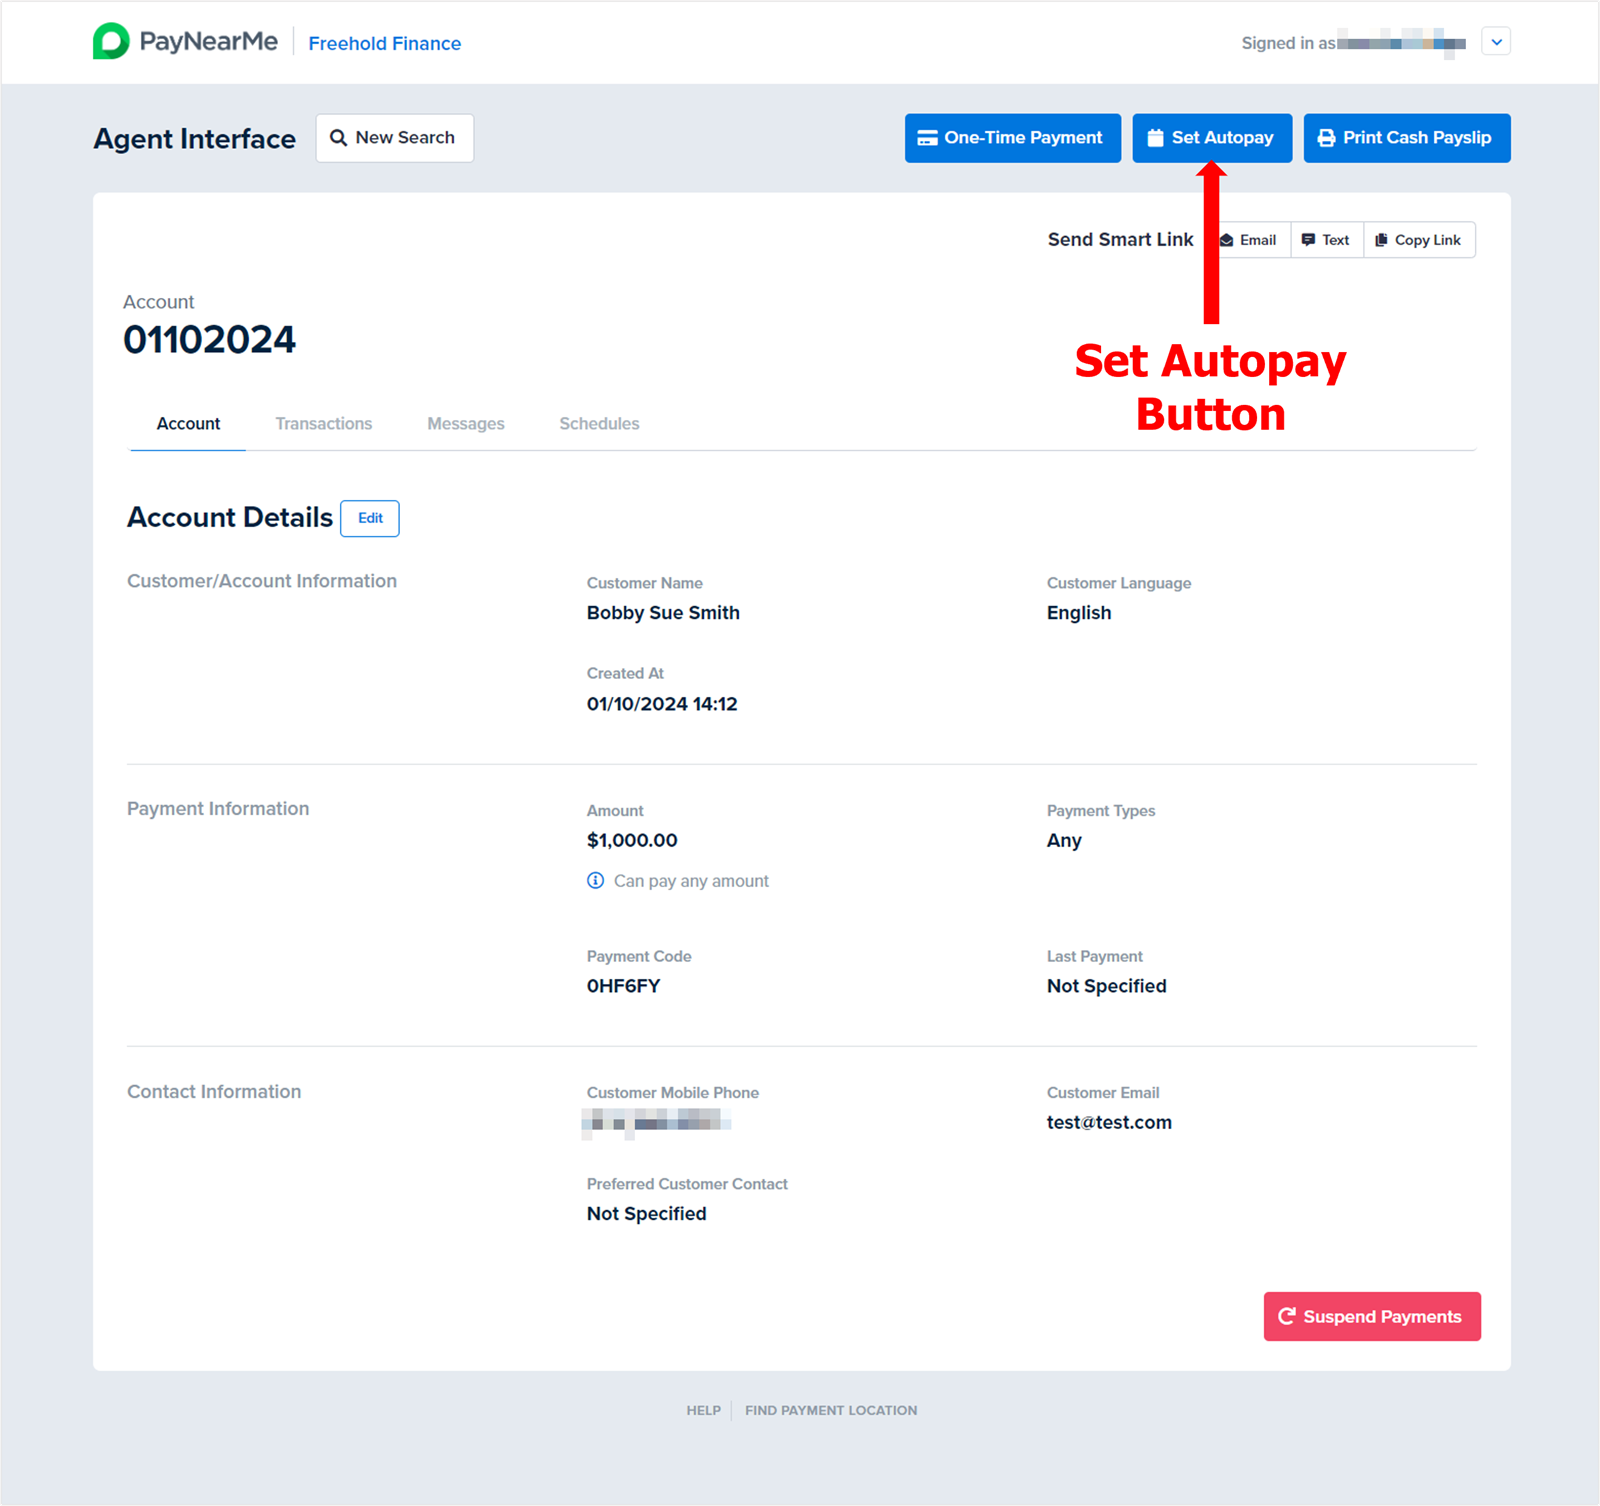
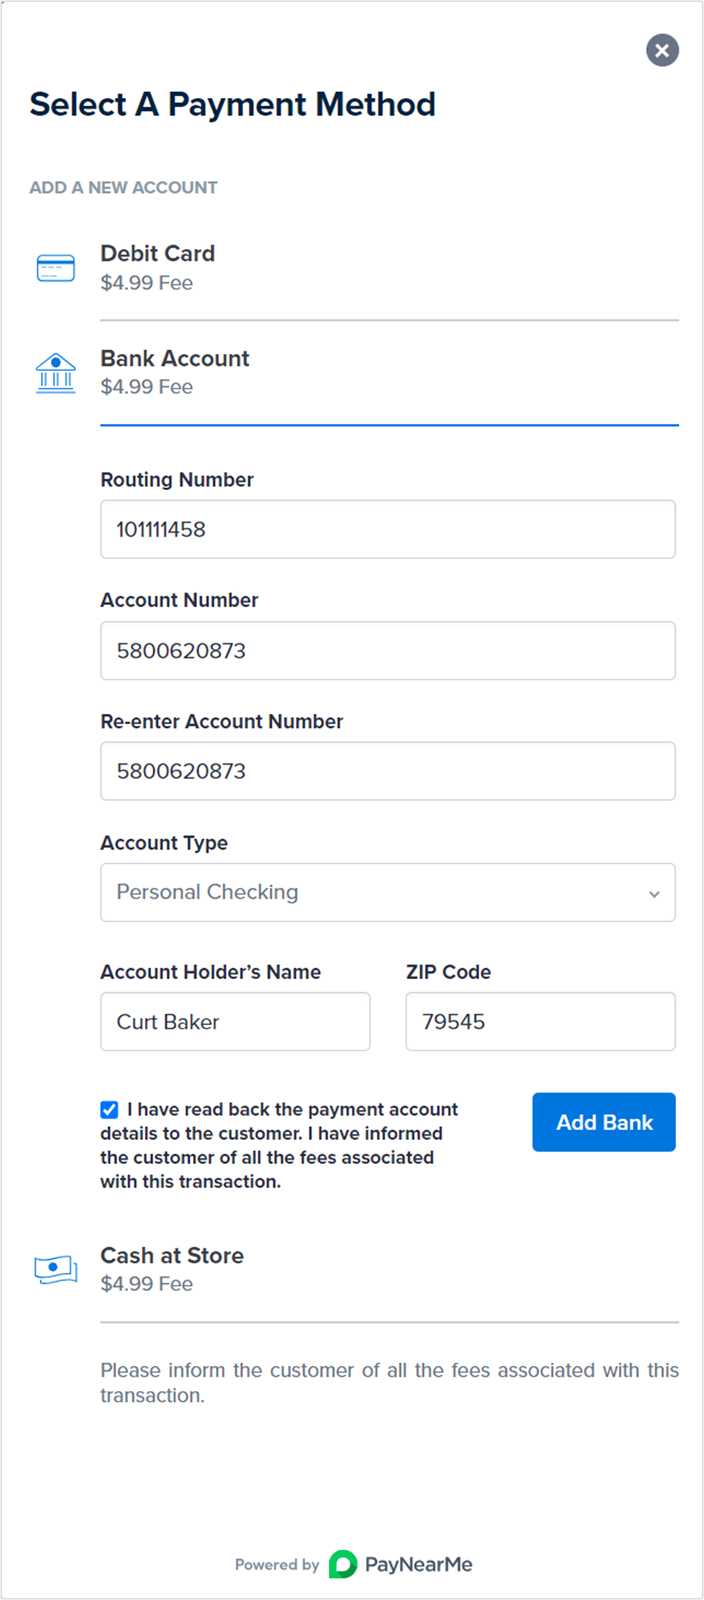
A “Select a Payment Method” modal displays.
-
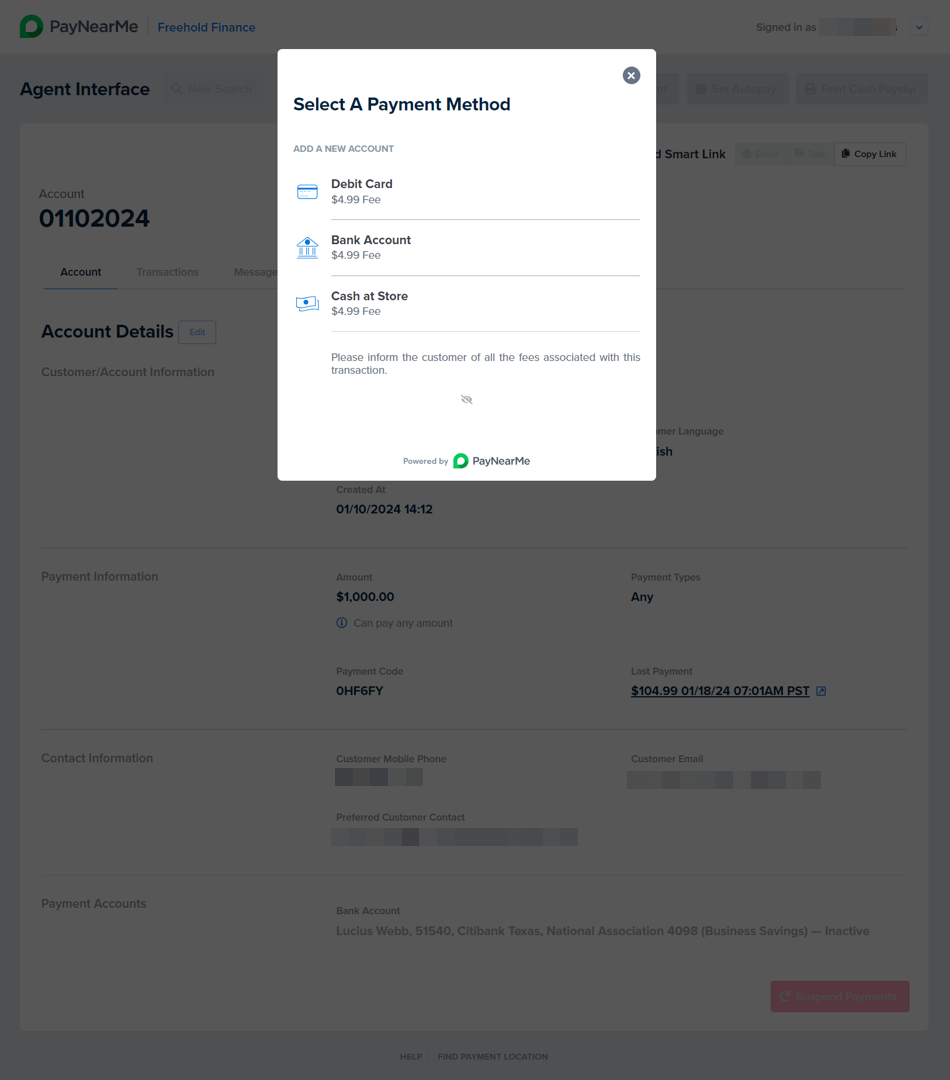
Click on the payment method the consumer wants to use for recurring payments. Autopay schedules only support card or bank account payment methods.
-
If using an existing payment method, select it and continue on to step 4; otherwise, enter the required payment method data:
-
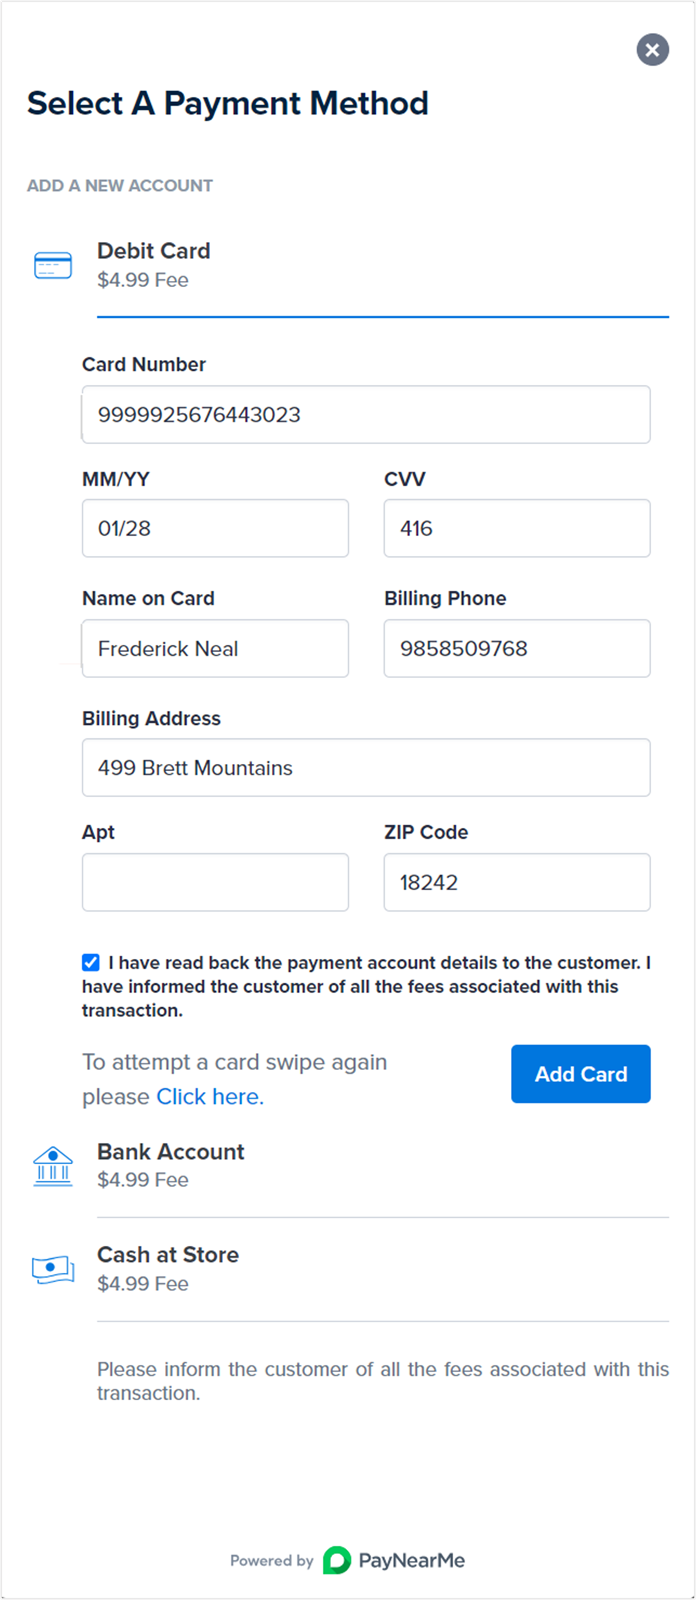
Debit cards can be swiped or manually entered. For manual entry, ensure the Card Number, Expiration Date, CVV, Name on Card, Billing Phone, Billing Address, and ZIP Code fields are correct by reading the payment account details back to the consumer for confirmation. Also, ensure that you’ve checked the “I have read back the payment account details to the customer. I have informed the customer of all the fees associated with this transaction.” checkbox before clicking Add Card.
-
Bank account information must be manually entered. Ensure the Routing Number, Account Number, Account Type, Account Holder’s Name, and ZIP Code fields are correct by reading the payment account details back to the consumer for confirmation. Also, ensure that you’ve checked the “I have read back the payment account details to the customer. I have informed the customer of all the fees associated with this transaction.” checkbox before clicking Add Bank.
-
-
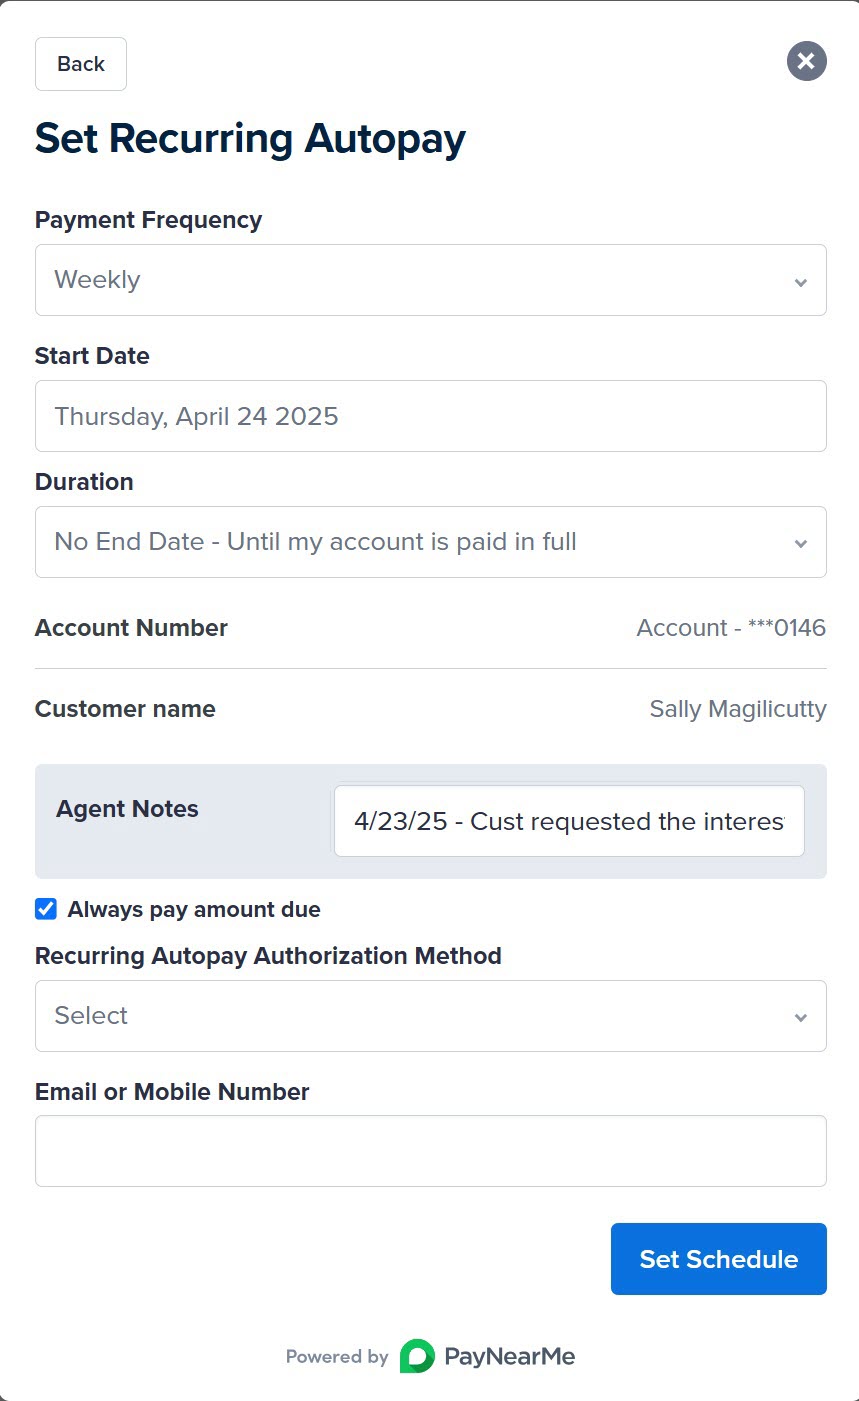
After selecting the existing payment method or adding the new payment method information, the “Set Recurring Autopay” box displays.
-
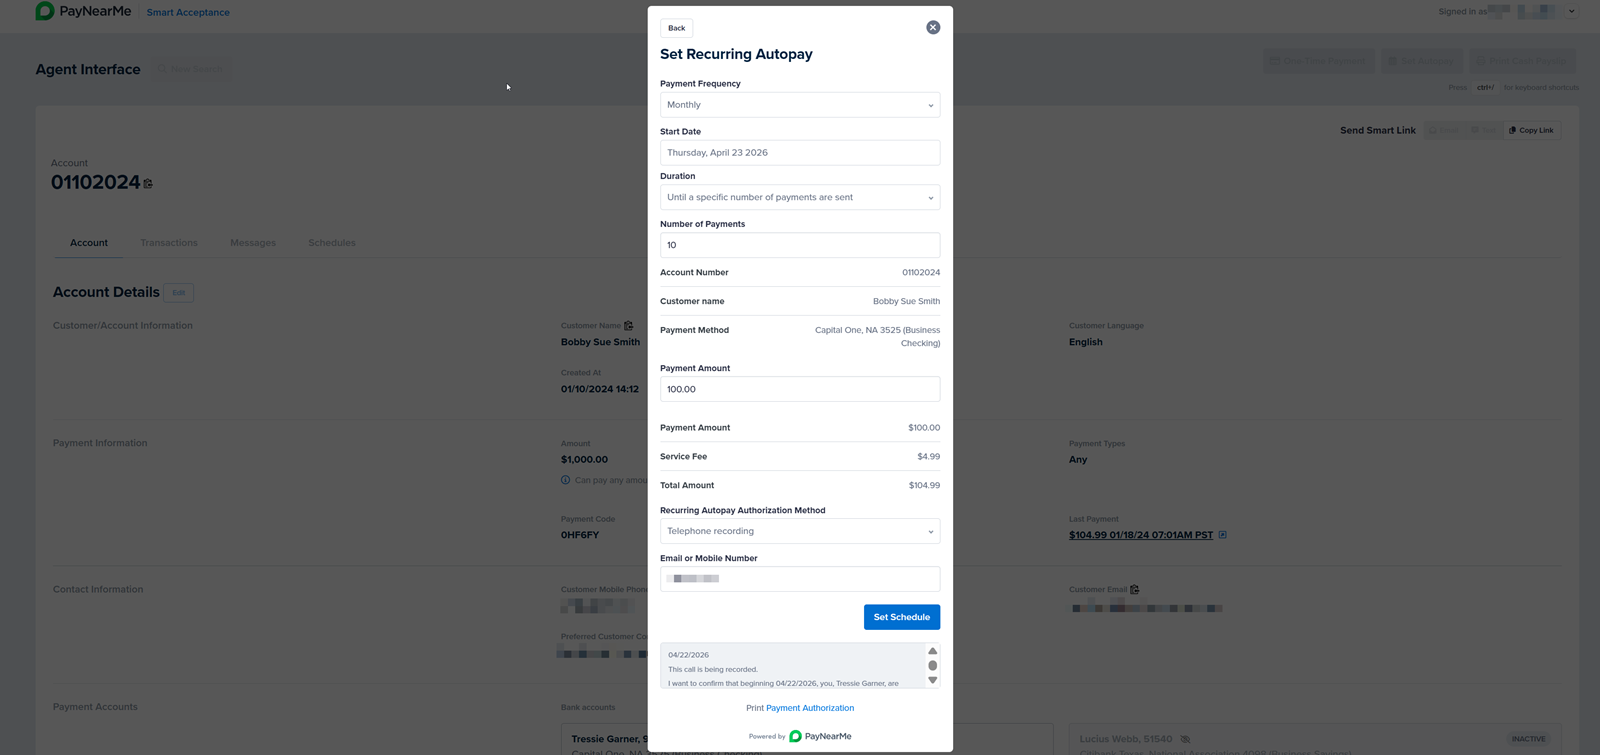
Use the dropdown menu in the Payment Frequency field to select one of the following frequencies:
- Weekly – Payments are made every week on the same day as the specified Start Date (e.g., every Wednesday)
- Every Other Week – Payments are made every other week on the same day as the specified Start Date (e.g., every other Wednesday)
- Twice a Month – Payments are made twice a month on the dates specified in the Day of First Payment and Day of Second Payment fields (e.g., the 15th and 28th of every month)
- Monthly – Payments are made each month on the same date as the specified Start Date (e.g., the 20th of every month)
- Last Day of Each Month – Payments are made on the last day of every month (e.g., the last day of every month)
-
Use the date picker in the Start Date field to select when the consumer wants to start the autopay schedule. For weekly and every other week schedules, the payment will occur on whatever day of the week is specified in this field. For monthly schedules, the payment will occur on the same date each month. For the last day of the month schedule, the Start Date field will populate as a dropdown list that shows the last days of the next three months.
-
Use the dropdown in the Duration field to select how long this autopay schedule will run for this consumer. Supported options include the following:
- No end date – The schedule will run indefinitely until cancelled by the consumer or agent.
- Until a specific number of payments are sent – The schedule will run after a defined number of payments occur. When this duration option is selected, a Number of Payments field displays where the agent can enter how many payments the consumer wants to include in this autopay schedule.
- Until a specific end date – The schedule will run until the specified end date. When this duration option is selected, an End Date field displays where the agent can use a date picker to select a date for when the autopay schedule will end.
-
If the consumer opted for the Twice a Month payment frequency, enter his/her/their preferred days in the Day of First Payment and Day of Last Payment fields. The options for these fields are Day 1-30 or the Last Day of the month (i.e., day 28-31 depending on the month and the leap year).
-
Enter the amount the consumer wants to make with each payment in the Payment Amount field. Ensure the consumer understands that this amount does not include the convenience fee that may be required for each payment.
-
If enabled, enter your notes in the Agent Notes text field. This field enables agents to record up to 500 characters of pertinent notes about the consumer's account and/or payment. These notes can then be ingested into your LMS system of record for auditing and/or compliance purposes. To enable agent notes, contact your PayNearMe Technical Account Manager.
-
Use the dropdown in the Recurring Autopay Authorization Method to select how the consumer wants to authorize the recurring scheduled of payments. Supported options include the following:
-
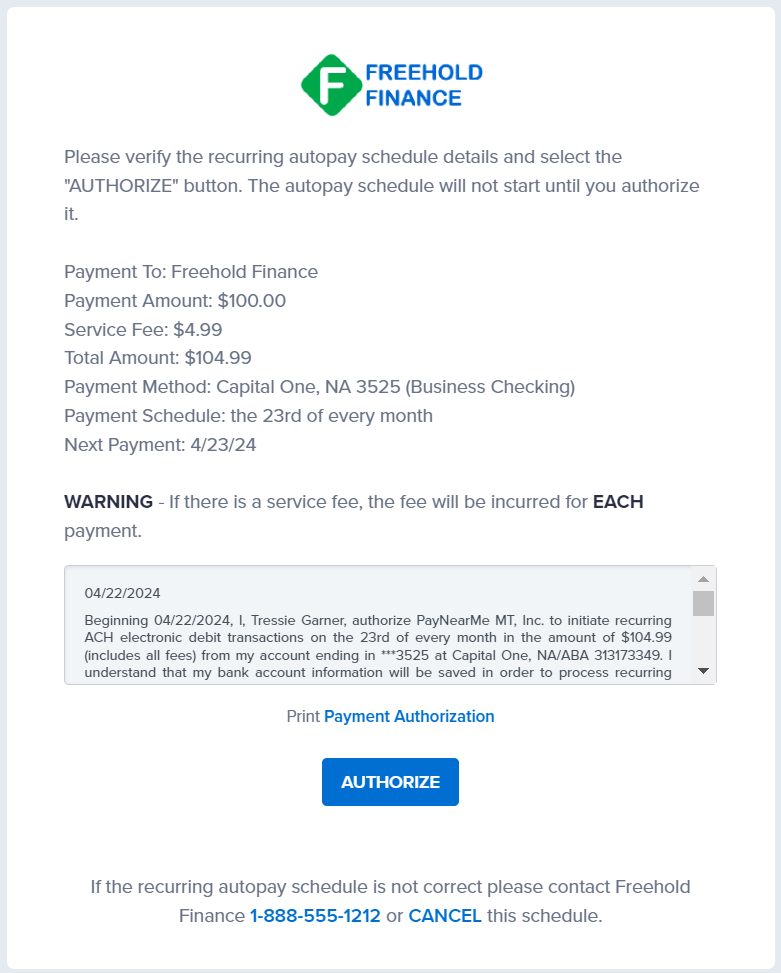
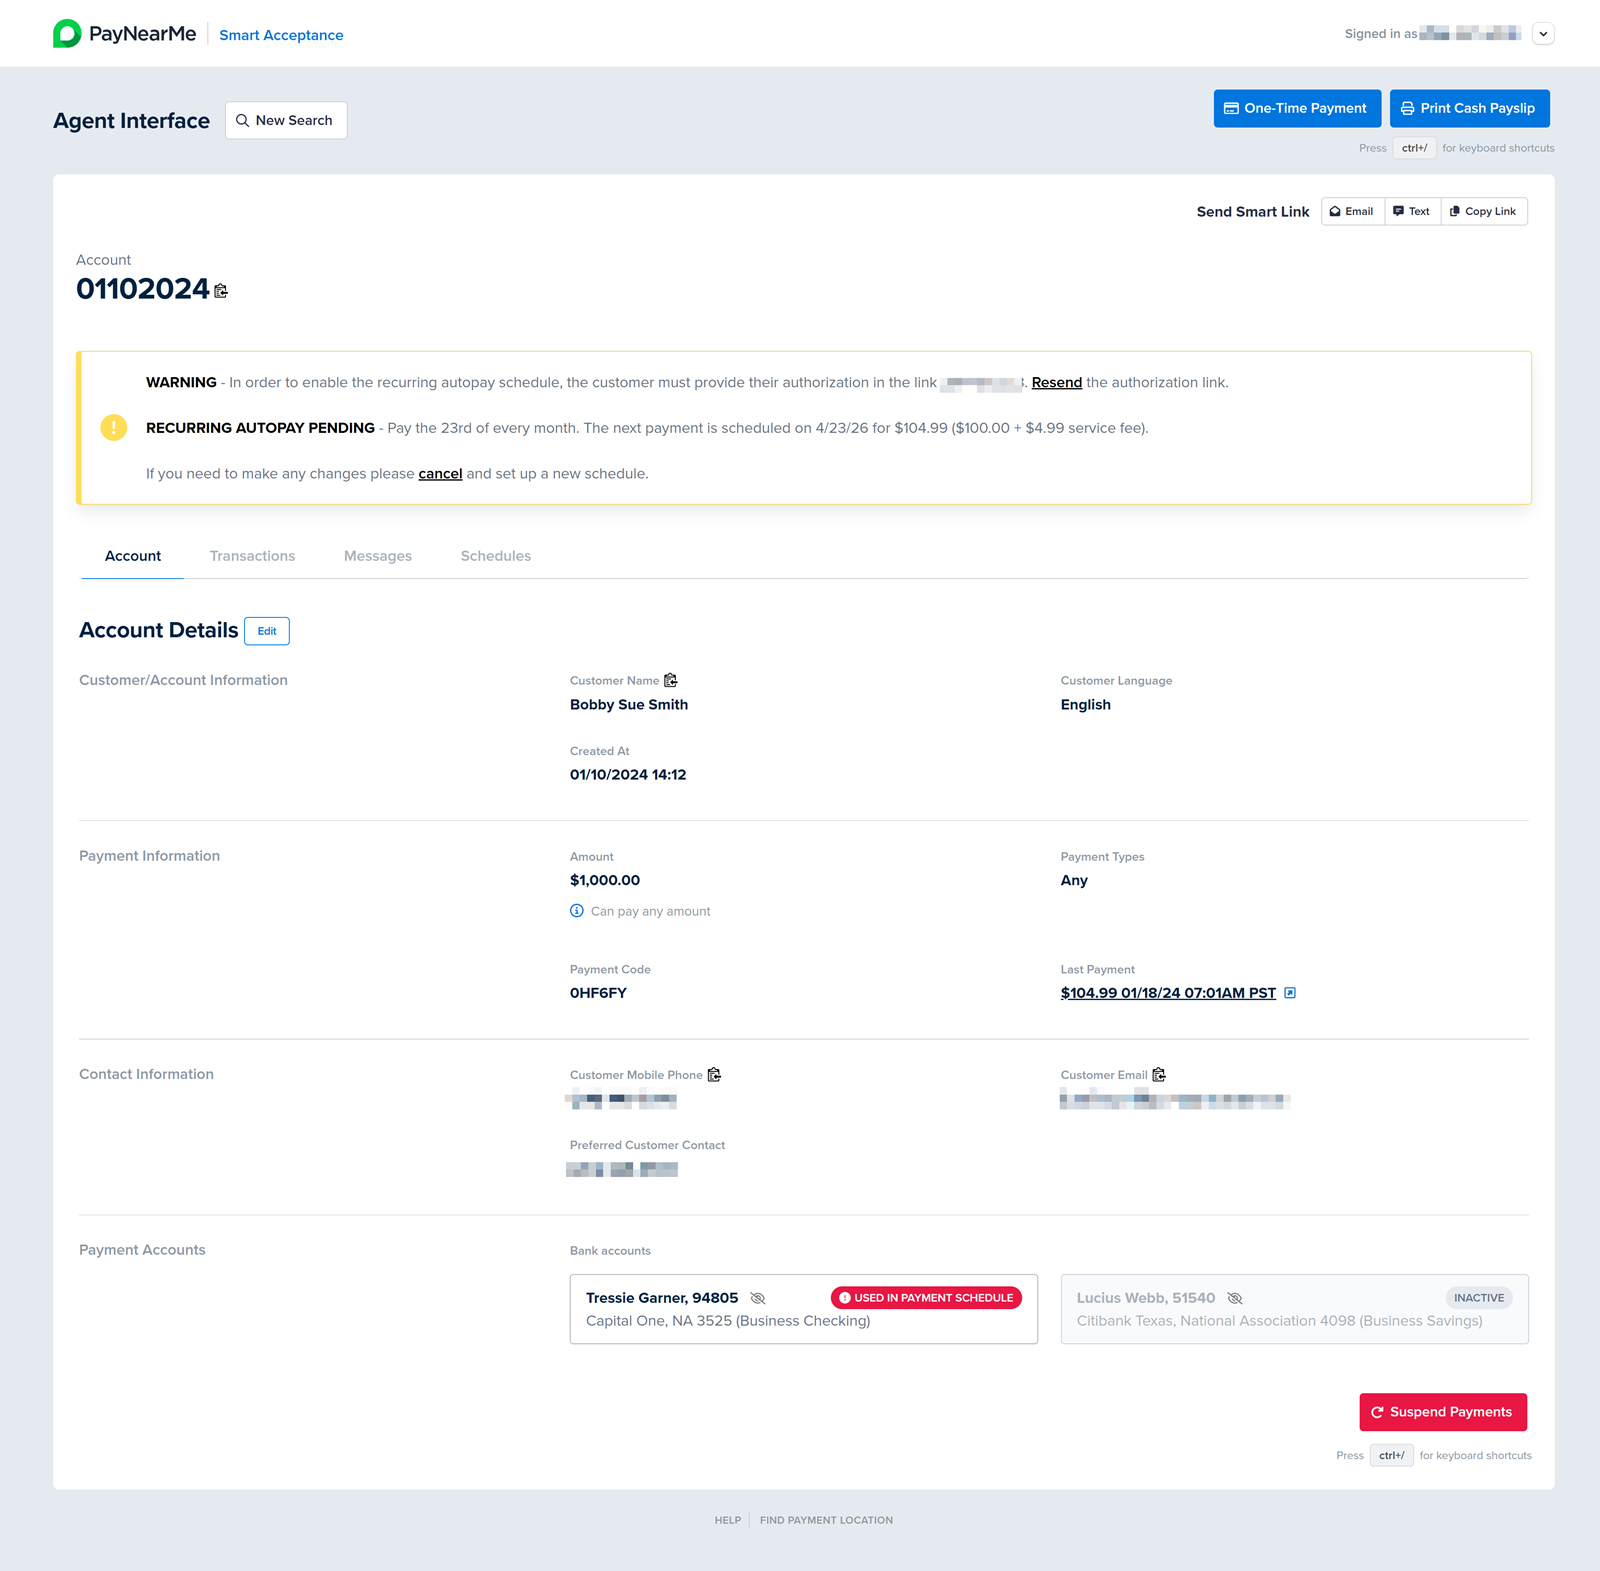
Requires consumer authorization – The Agent Interface will send an authorization request to the consumer’s email address or mobile phone. The consumer must click the Authorize button before the start date of autopay schedule.
-
Received written authorization – The consumer provided a signed statement authorizing the recurring payments to occur. When this option is selected, a Written Authorization Date field displays. Use the date picker in the Written Authorization Date field to select when the consumer authorized the scheduled in writing.
-
Telephone recording – When this option is selected, the Agent Interface displays autopay authorization verbiage that can be read back to the consumer. This option is for clients that record their Customer Service calls.
-
-
In the Email or Mobile Number field, enter the consumer’s preferred method of contact. This email address or phone number will be used by PayNearMe to send reminders and updates about the autopay schedule in emails or text messages.
-
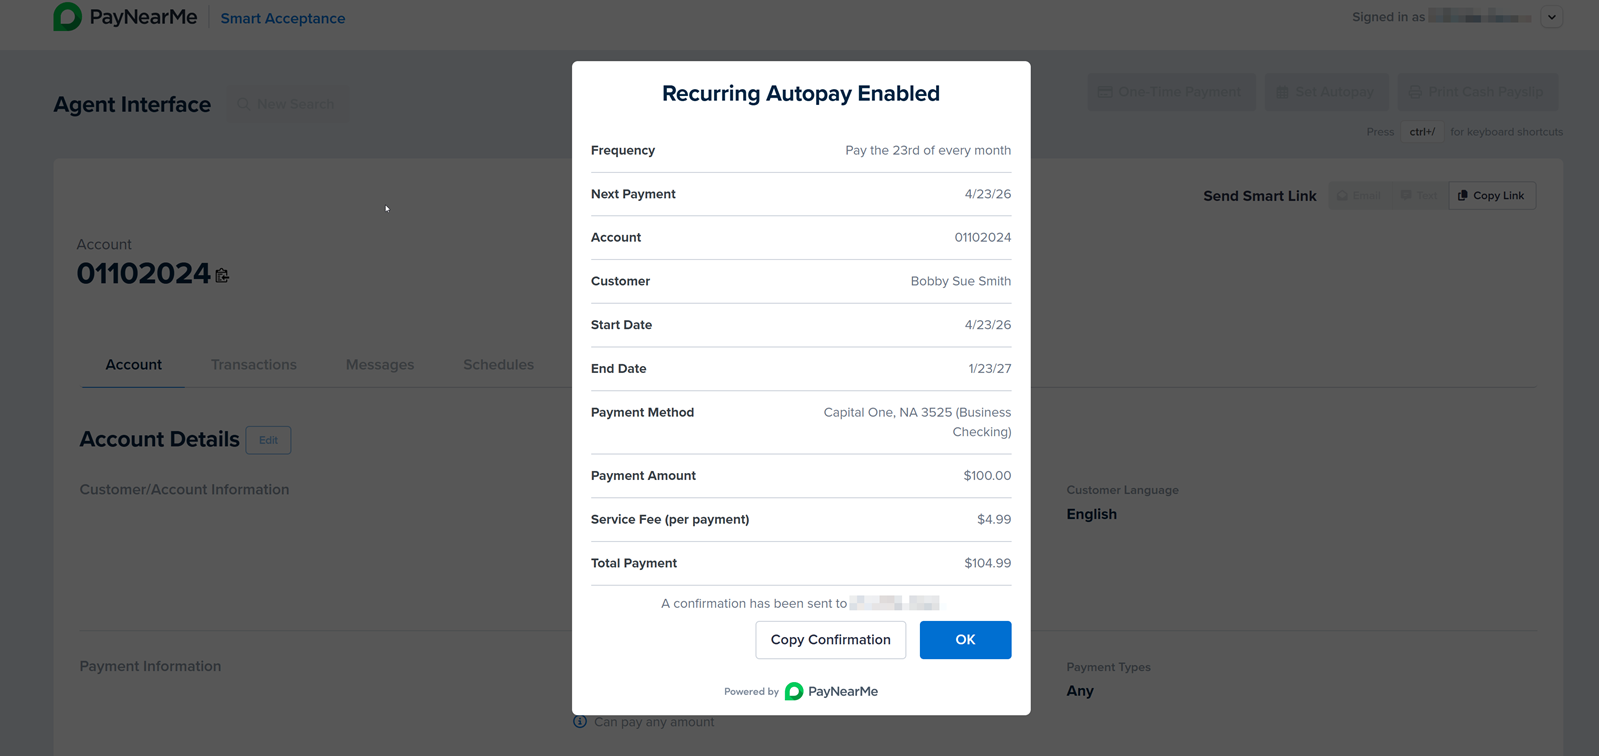
Once you’ve completed every field for the consumer, click Set Schedule.
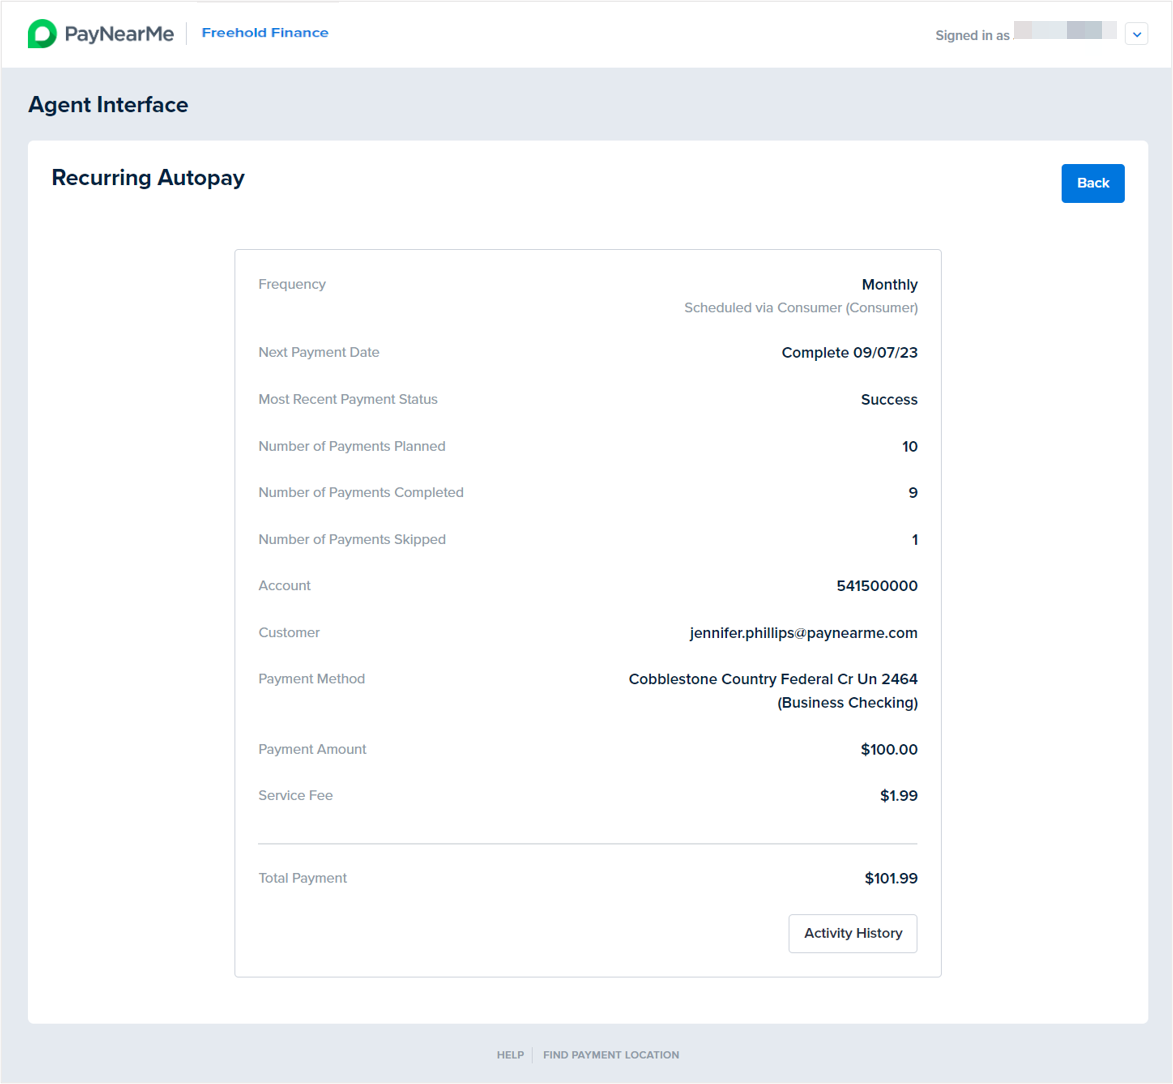
The Agent Interface displays a summary of the autopay schedule.
If you chose the Requires consumer authorization method for the Recurring Autopay Authorization Method, the consumer will receive either an email or text message asking him/her/them to authorize the schedule. Until the schedule is authorized the following message displays on the consumer’s Account page.
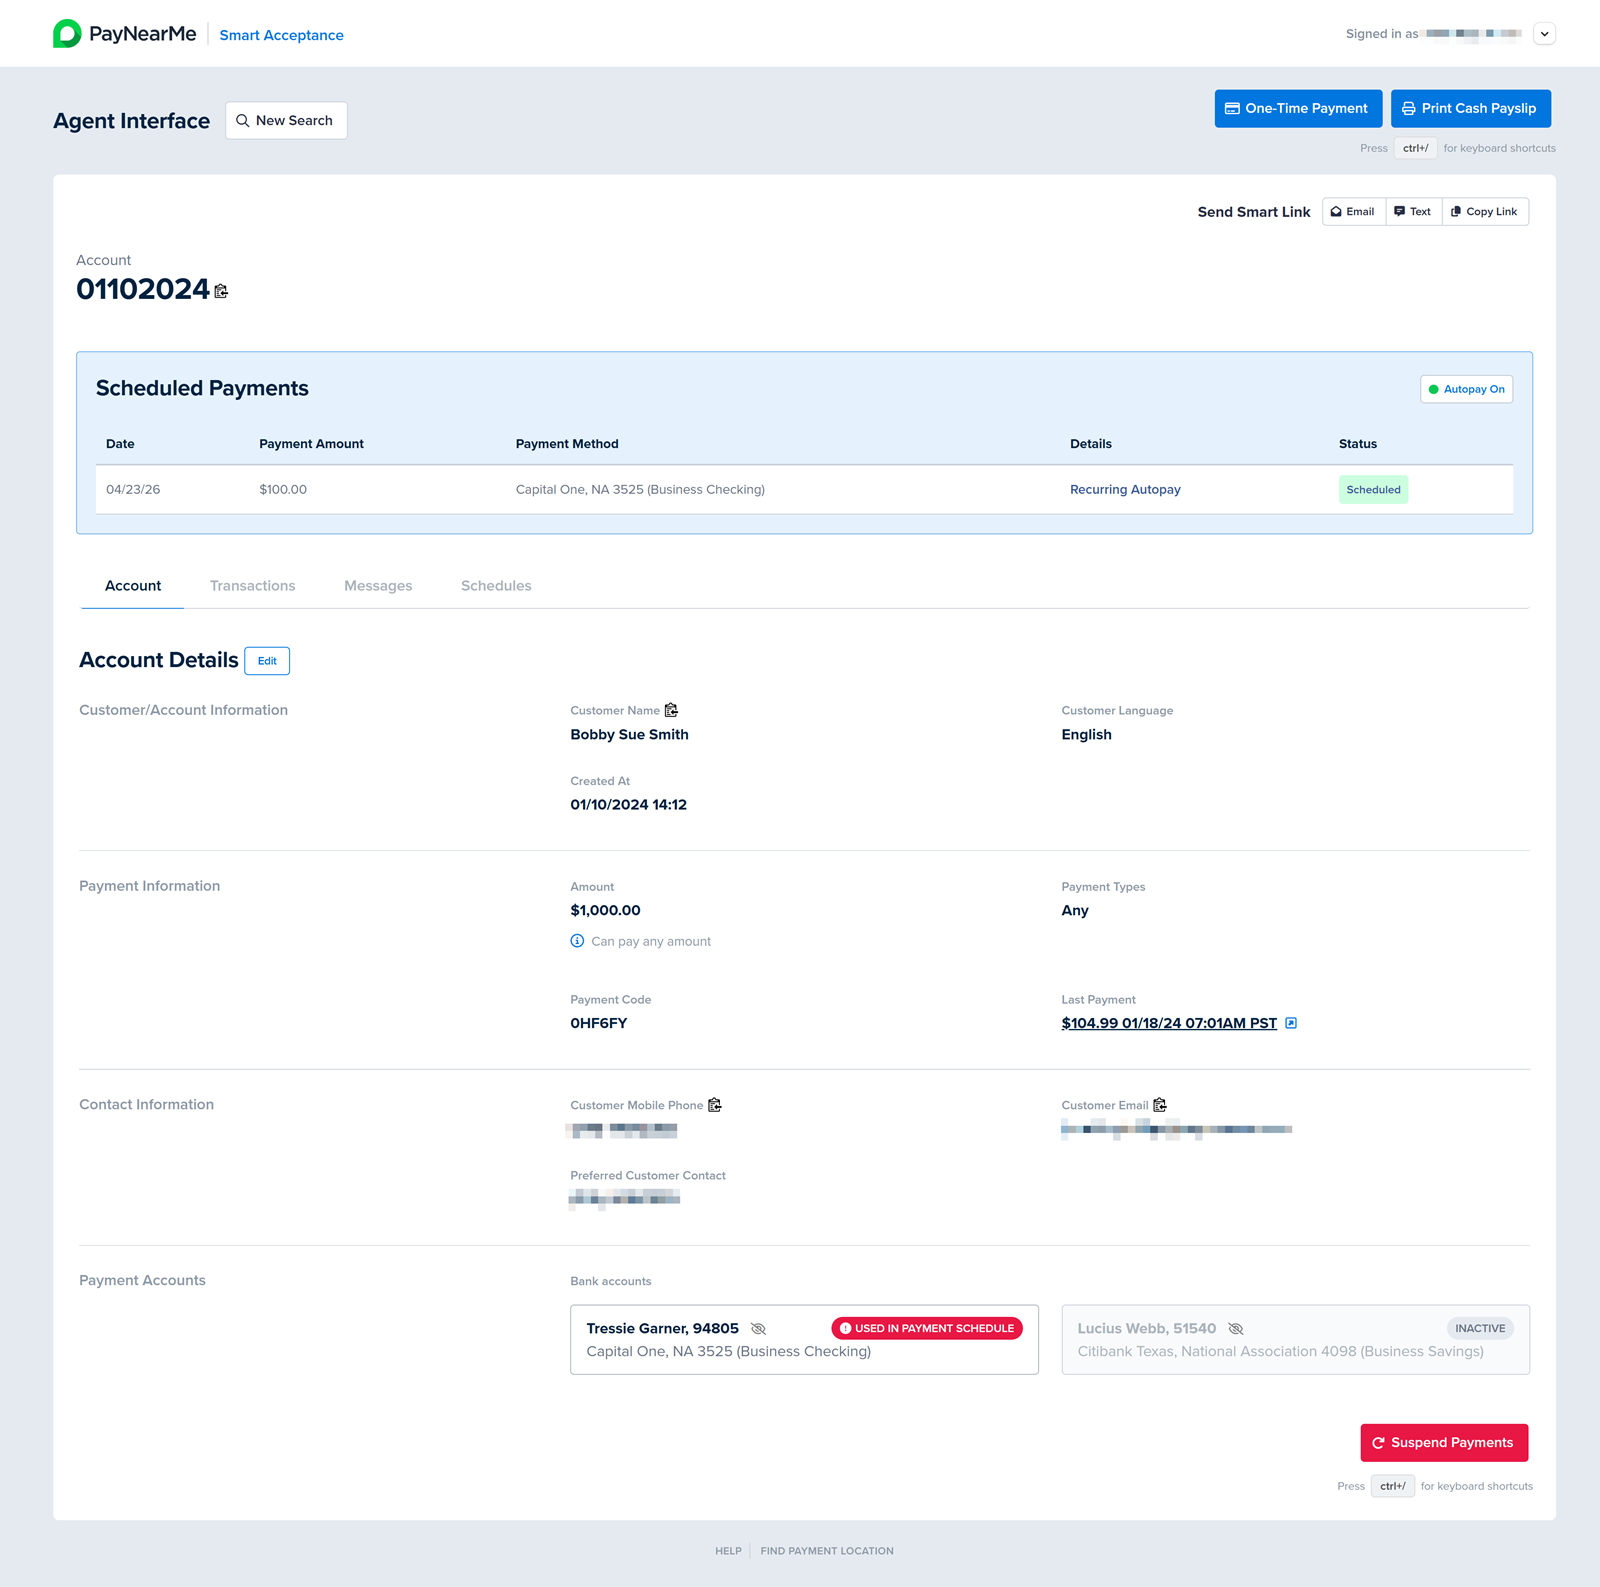
Once authorized, the schedule will display on the consumer’s Account page.
Skipping a Payment in an Autopay Schedule
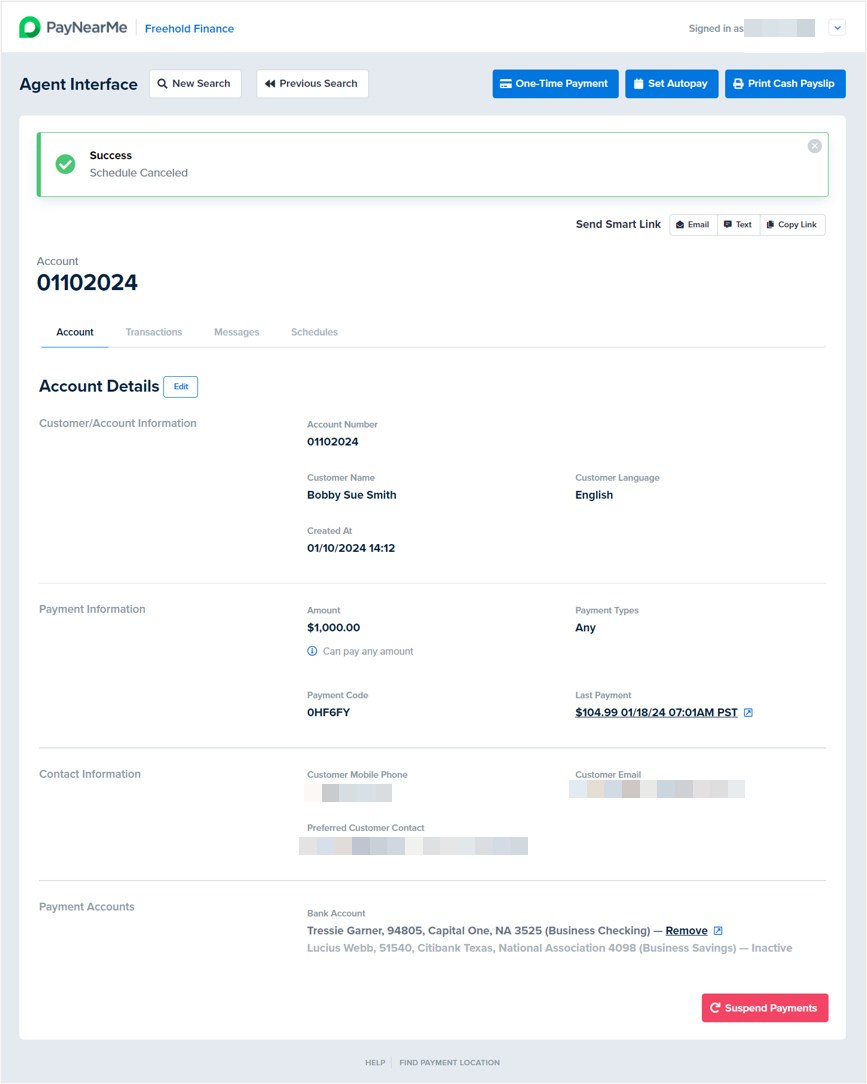
Agents can skip payments in autopay schedules. When skipping payments, advise the consumer he/she/they will need to make a one-time payment either before the next scheduled payment or after the autopay schedule completes. The payment amounts of the remaining payments in the schedule cannot be modified to include the skipped payment amount. Once created, autopay schedules cannot be changed; rather, they must be canceled and a new autopay schedule must be created. To skip a payment in an autopay schedule, access the consumer’s Account page and then complete the following steps:
-
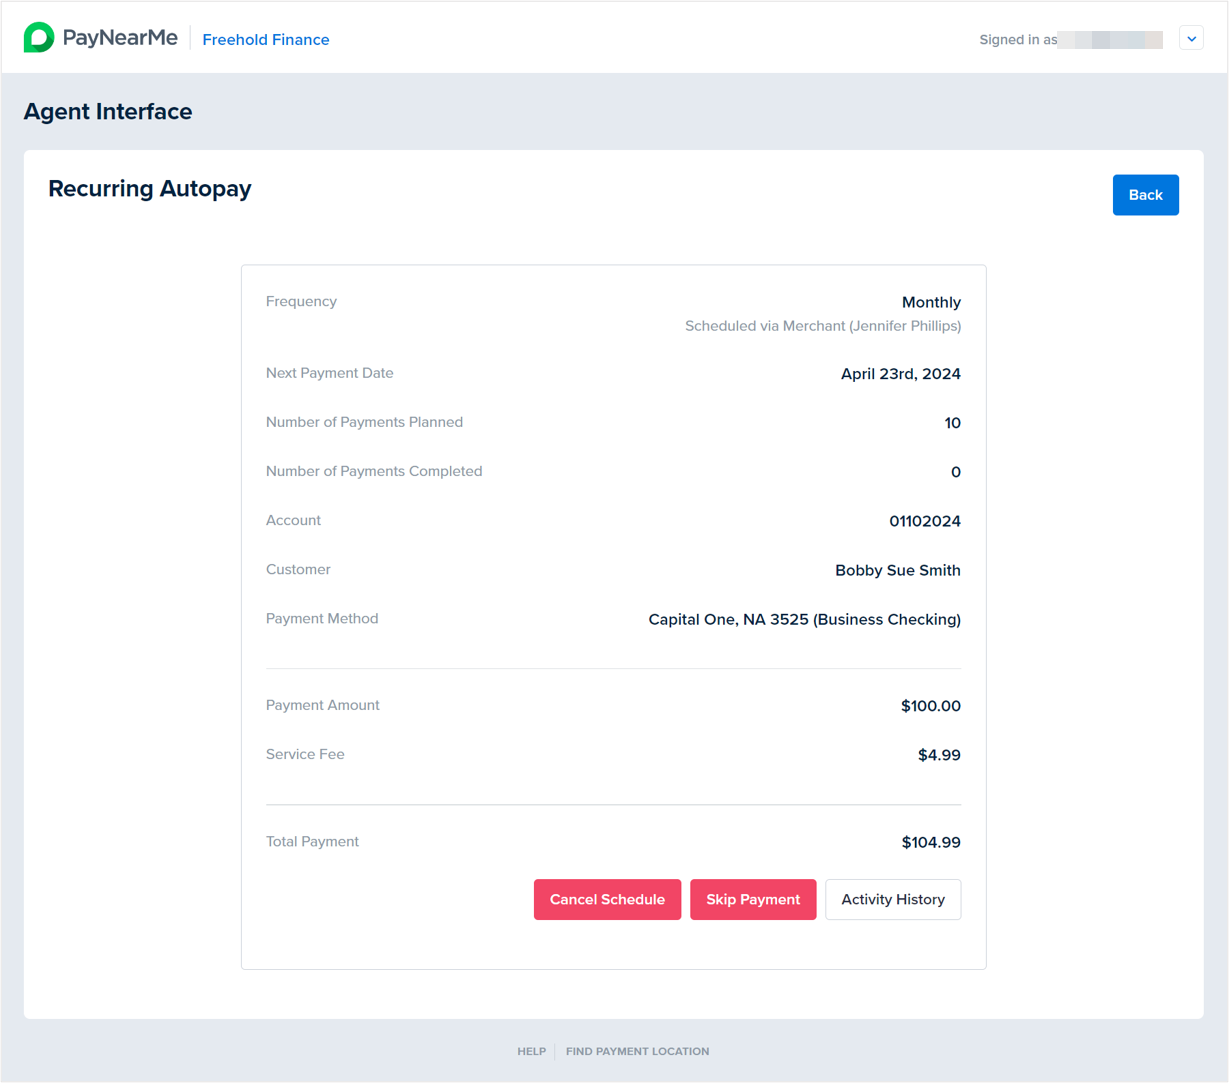
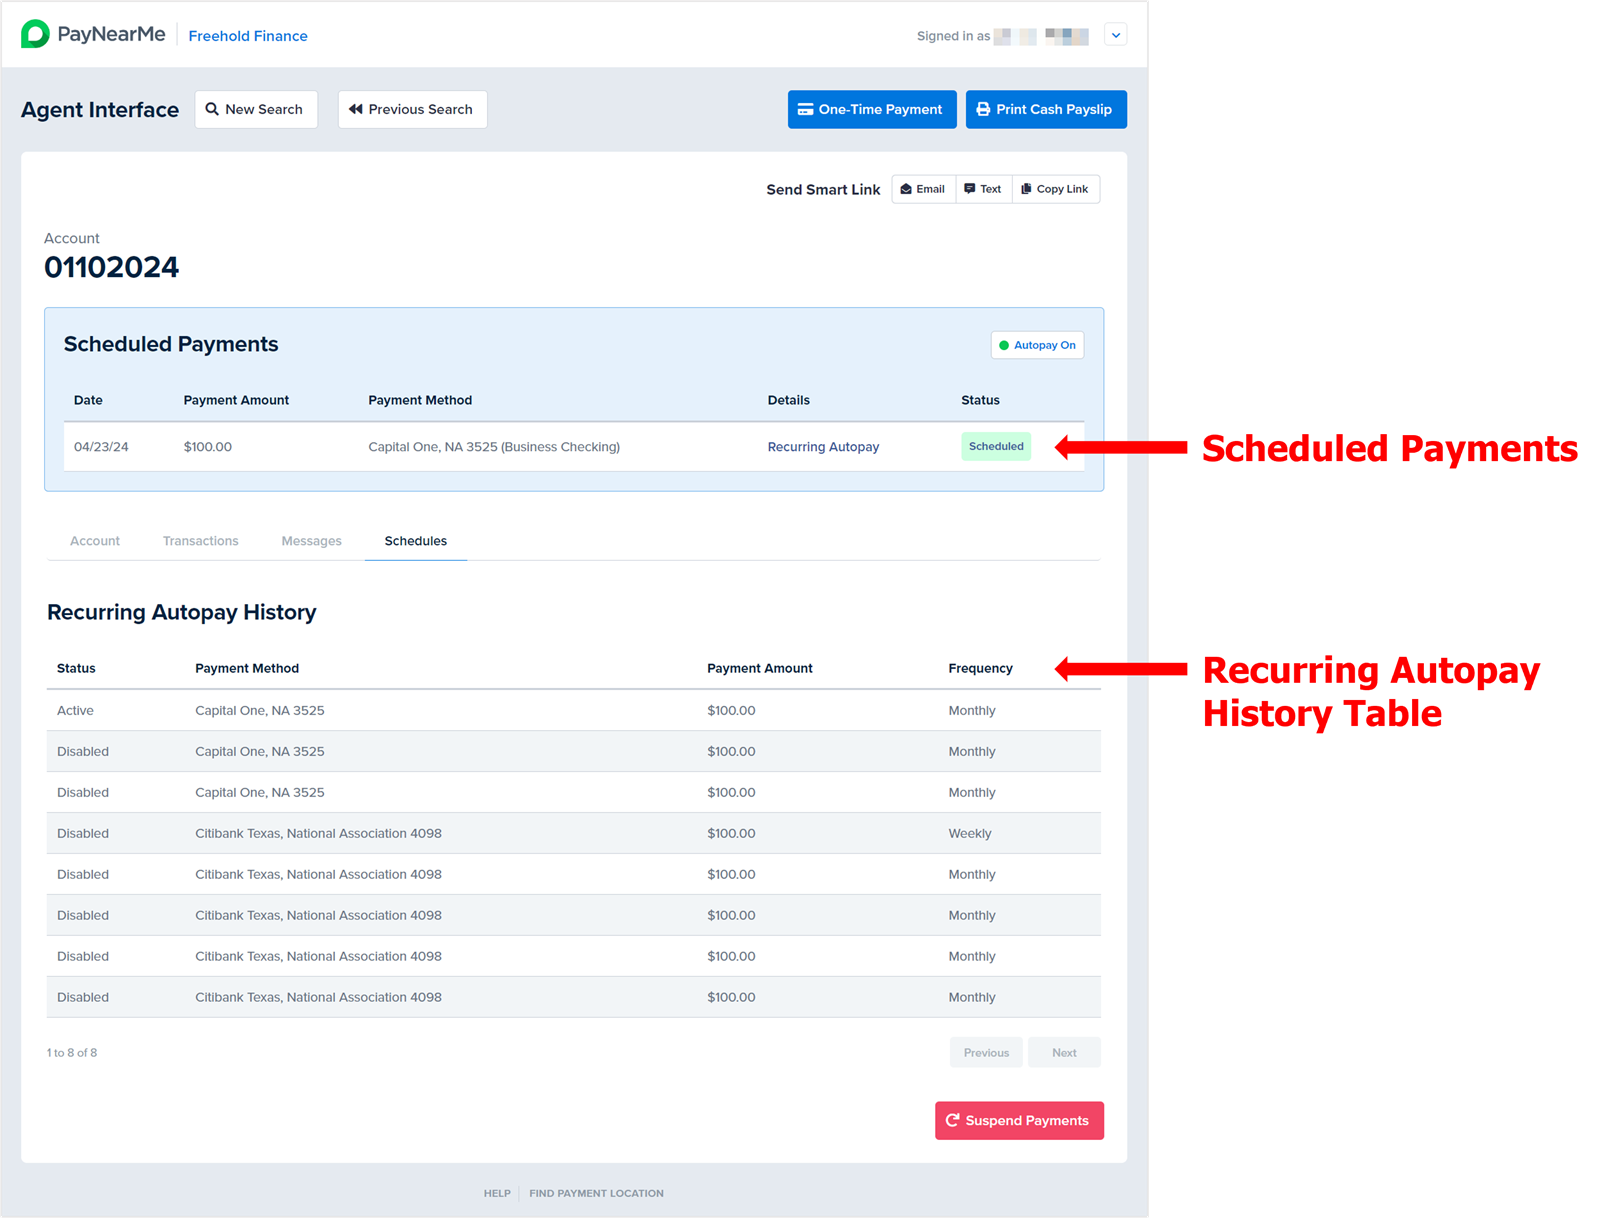
Navigate to the “Recurring Autopay” screen, by either clicking the active schedule in the Scheduled Payments box or in the Recurring Autopay History table on the Schedules tab.

-
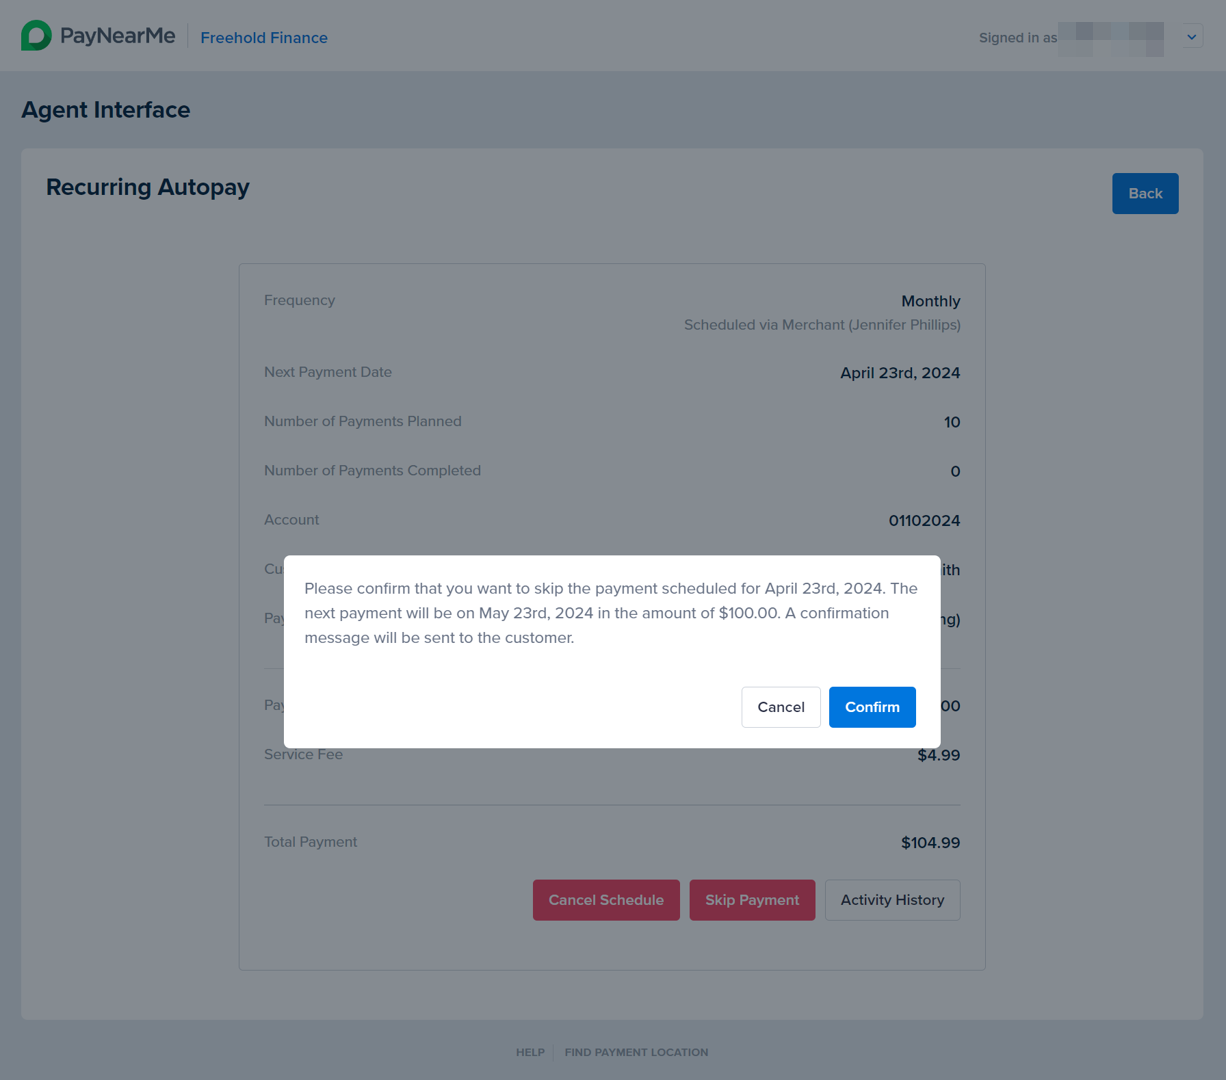
Once you’ve accessed the “Recurring Autopay” screen, click the Skip Payment button.

-
A message displays asking you to confirm the skipped payment.
-
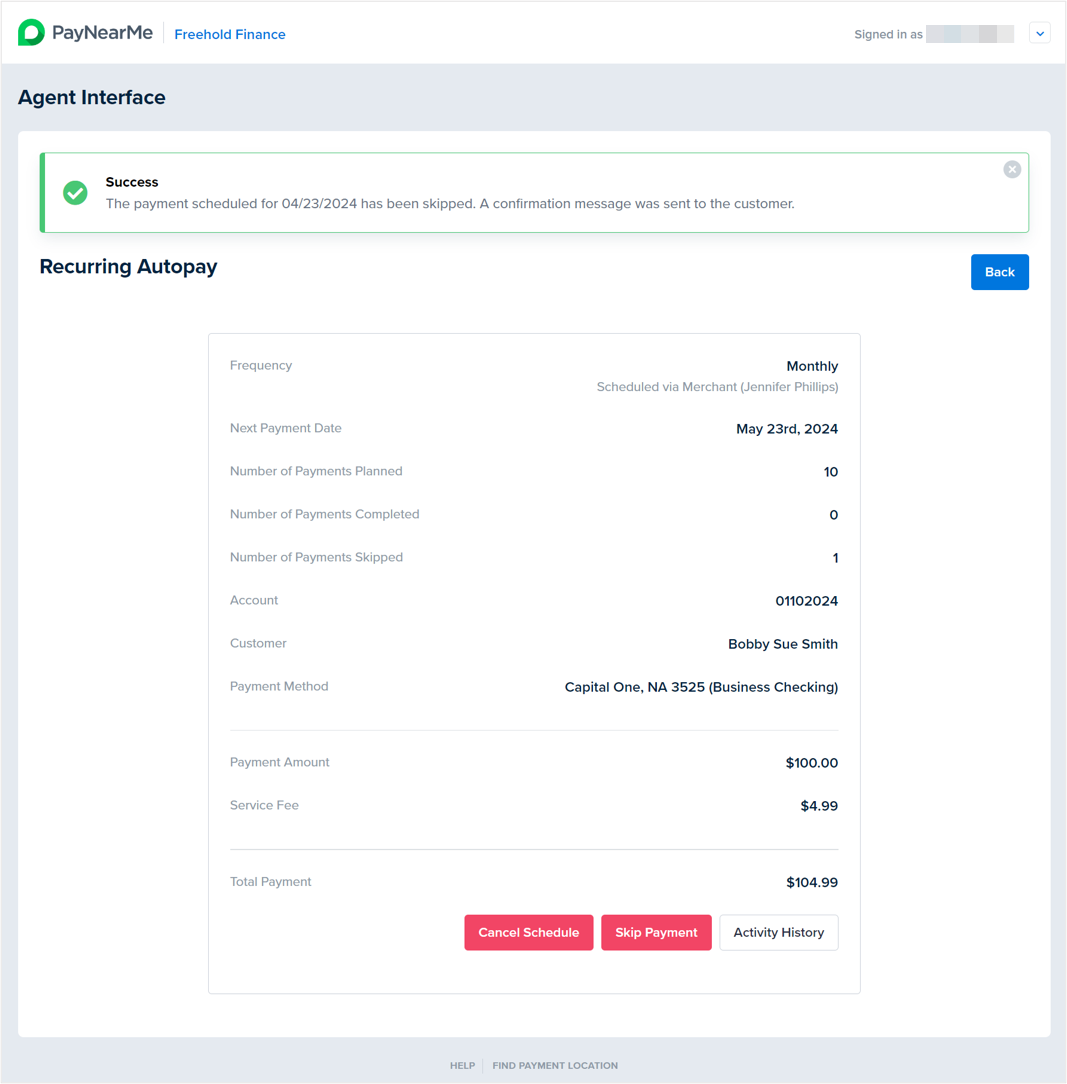
Click Confirm. The Agent Interface returns you to the “Recurring Autopay” screen and displays a message indicating whether or not the payment was successfully skipped. The consumer will also receive an email or a text message indicating the next payment in the schedule will be skipped.
Canceling an Autopay Schedule
To cancel an autopay schedule, access the consumer’s Account page and then complete the following steps:
-
Navigate to the “Recurring Autopay” screen, by either clicking the active schedule in the Scheduled Payments box or in the Recurring Autopay History table on the Schedules tab.

-
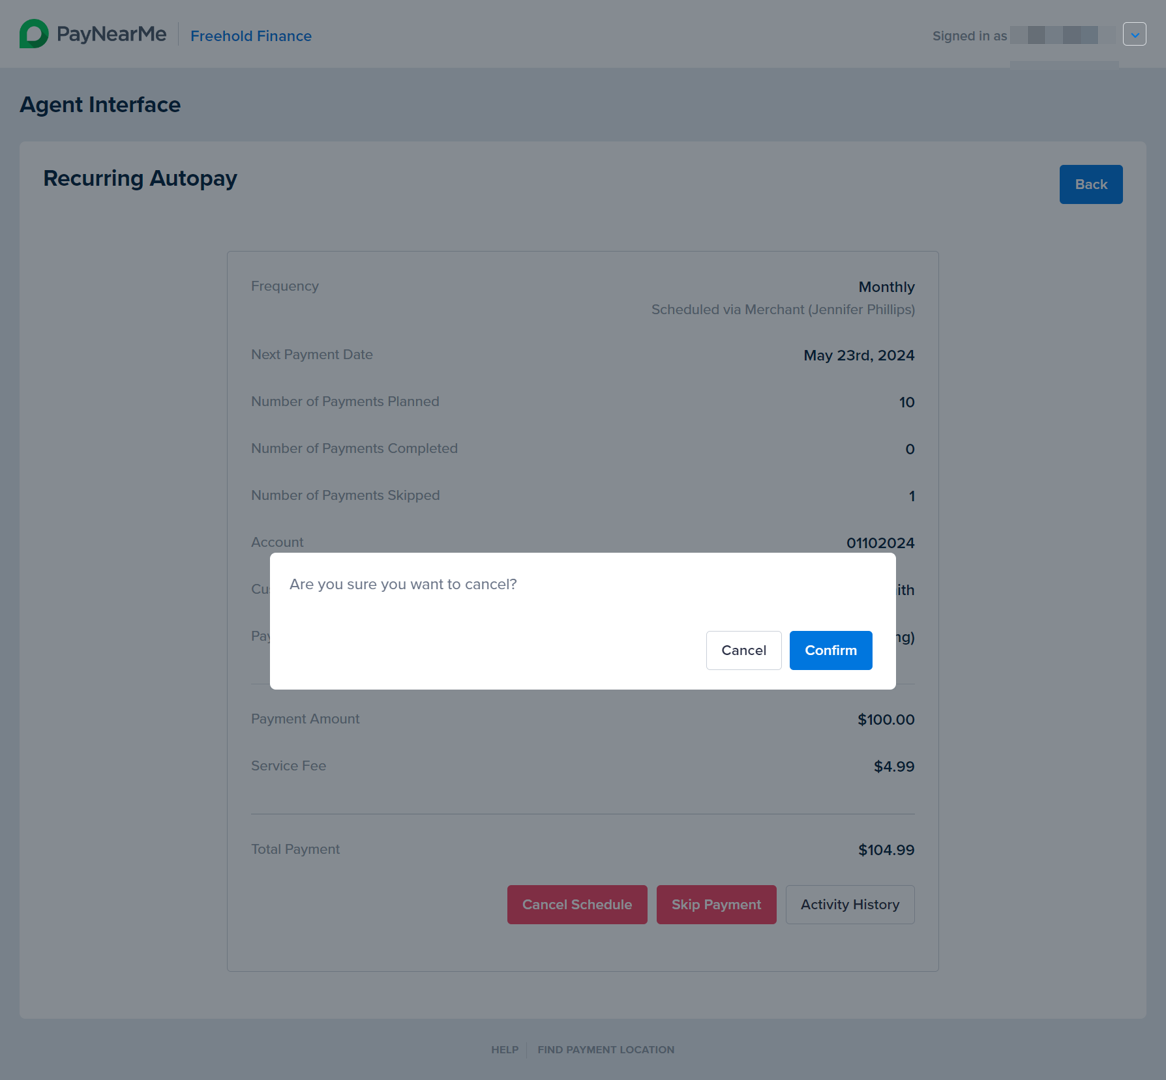
Once you’ve accessed the “Recurring Autopay” screen, click the Cancel Schedule button.
-
A message displays asking you to confirm the cancellation.
-
Click Confirm. The Agent Interface returns you to the consumer’s Account page and displays a message indicating whether or not the schedule was successfully canceled. The consumer will also receive an email or a text message indicating that the schedule was canceled.
Viewing the Activity of an Autopay Schedule
To view the payment activity for both active and completed autopay schedules, complete the following steps:
-
Navigate to the Recurring Autopay screen, by either clicking the desired schedule in the Scheduled Payments box or in the Recurring Autopay History table on the Schedules tab.
-
Once you’ve accessed the Recurring Autopay screen of the desired schedule, click the Activity History button.
-
The “Autopay Activity History” screen displays that shows all the completed, skipped, and/or declined payments that were made for this autopay schedule.
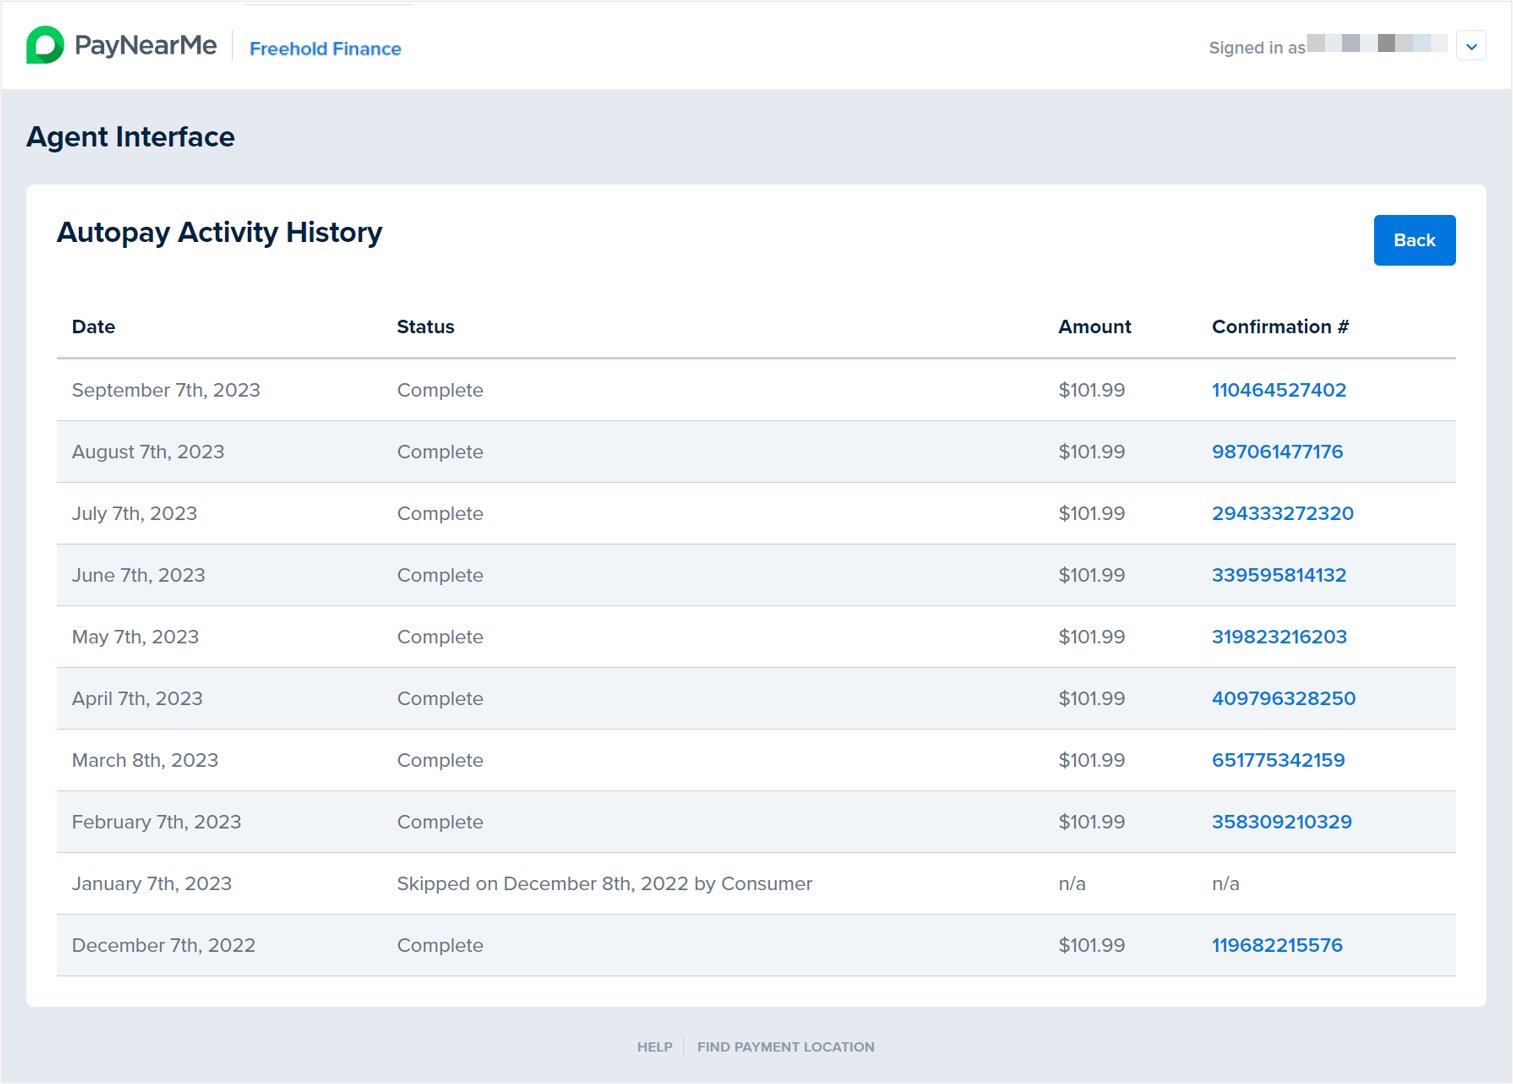
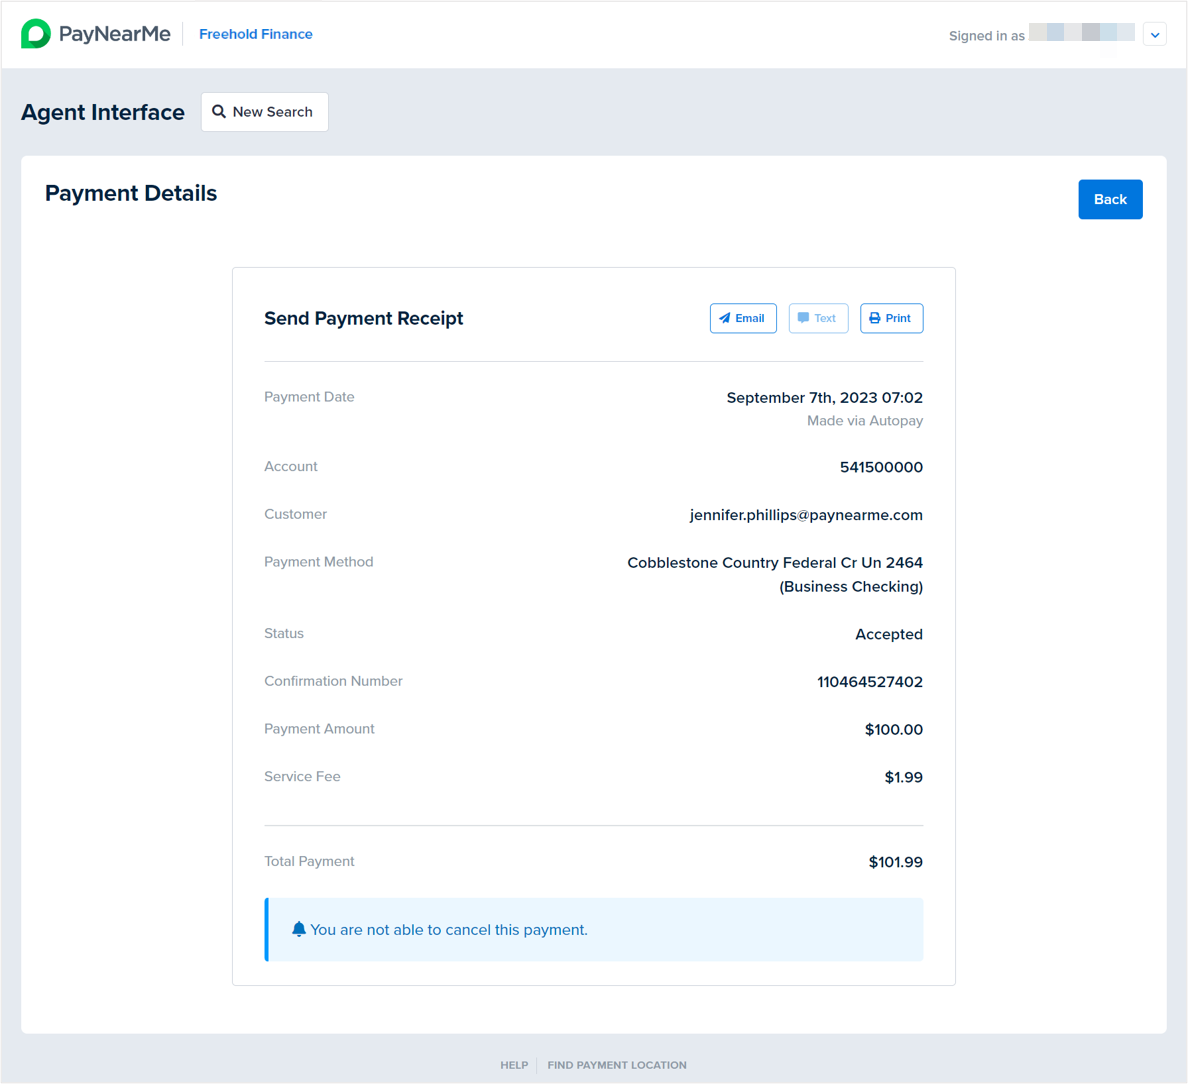
To view the individual payments of the schedule, click the payment’s linked Confirmation Number. The transaction’s Payment Details screen displays where you can email, text, or print the payment receipt for the consumer.